Rewix Plugin for WordPress
WordPress Rewix Plugin Guide
How to configure Rewix Plugin for WordPress
If you still didn’t install Rewix Plugin, follow the wizard on the Installation procedure page..
Before using Rewix Plugin, you must configure it correctly.
PAY ATTENTION
To use Rewix Plugin it is required to get a dropshipping service subscription from your wholesaler (contact your supplier to get more info). Once you get a dropshipping subscription, you will receive an API key. The API key is required to synchronize your data with your supplier’s e-commerce site.
When you activate thre dropshipping service, you will have an active account on the wholesaler’s platform. By logging into your profile, you can find the API key in the <My subscription> panel.
PAY ATTENTION
Each product, category and price settings change (if not specified) will only be effective on new products or reimportation of existing products.
The configuration involves two components: the API and price management. Follow our guide and start creating your own shop in dropshipping!
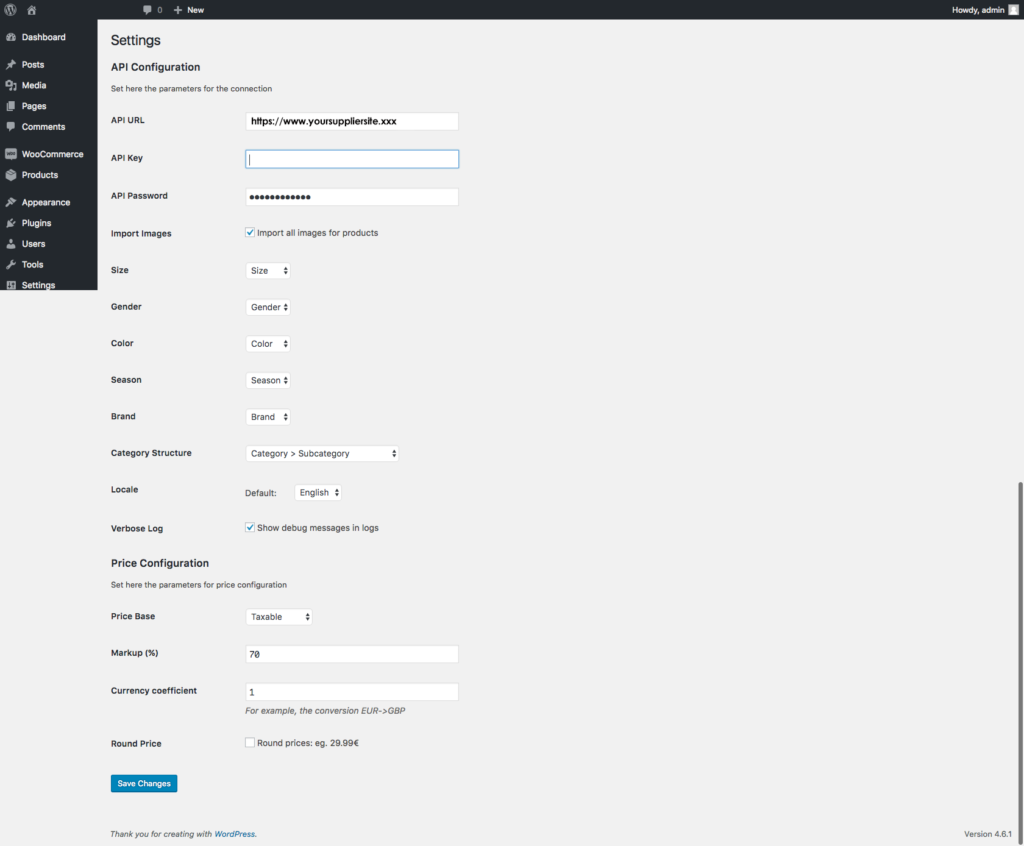
API configuration
URL API: supplier’s website URL
KEY API: By activating a dropshipping subscription with your supplier, you will have an account on your supplier’s platform, your own personal area where you manage orders. In the personal area, in <My Subscription> you will find the API Key. This API Key will be associated with your account that will use the integration between your e-commerce and your supplier’s one.
PASSWORD API: This password is the one you use to access your supplier’s e-commerce platform. When you activate a dropshipping subscription you will need to create an account to access his platform. WARNING: The password you chose when creating your account, corresponds to the API password you will need to use when setting up Rewix Plugin.
VERBOSE LOG : Makes debugging messages visible in the Log files
Attributes Configuration
To filter the products and show the catalogue on the import page, it is necessary to create attributes, that are required by the plugin, before launching the first import.
The attributes that you need to create are:
SIZE: is the attribute intended to host the information related to the sizes
GENDER: is the attribute intended to host the information related to the gender for which the article is suitable ( f.e. man/woman/unisex )
COLOR: is the attribute used to manage information about the color of imported items
BRAND: is the attribute intended to host the brand names of imported products
SEASON: is the attribute used to manage the season ( f.e. FW Fall Winter or SS Spring Summer) of the imported item
Not all the suppliers provide the products with these attributes. For further information check the available attributes on your supplier’s site.
Creating attributes is a standard Woocommerce procedure. There are several online guides and manuals that show the steps to perform the operation.
For more information you may refer to this guide for example:
https://www.ostraining.com/blog/woocommerce/woocommerce-attributes/
Special requisite: the parameter “Default custom order” set to “Custom ordering” set to the recently created attribute.
Once you create attributes in Woocommerce surf to and map the created attributes. For example, you will need to match the fields as follows: “Size” with the attribute you just created for the sizes management.
Configuration Language, Categories and Products
The LOCAL Parameter let you choose the language, the categories and values you wish
PAY ATTENTION
The plugin handles the products import in one language only and it’s not currently compatible with third-party plugins for multi-language management (such as WPML).
Choose from the menu the default language between the available languages on supplier’s site.
For more information check with your supplier which are the available languages.
After configuring the language you must also configure the structure of the CATEGORY. There are 2 available options :
- Option 1: this is the default structure. This configuration has the structure Categories -> Subcategories
- Option 2: this structure is meant for the categorization Gender -> Categories -> Subcategories
Margin and Price Configuration
SELECTED BASE PRICE. Rewix Plugin will set sales prices starting from the prices imported from the supplier and appliying the rules of markup that you will apply.
The prices imported by the supplier are:
- Taxable Price: your supplier’s sale price (without VAT) visible on your supplier’s website.
- Best Taxable: discounted sale price (without VAT) assigned to products that are currently on temporary sale on the supplier’s website (lower than the Taxable Price). If the product is not on temporary sale, the taxable price and the best taxable will have the same value. ATTENTION: the prices of the products you import with the Best Taxable price, once the promotion is finished, will not be updated on your website. Therefore, if you calculate your markup starting from the Best Taxable, when a price is highered by the supplier, you may notice that you are earning a smaller margin.
- Street Price: this price is the one you find crossed out on your supplier’s website and indicates the list price of sale to the final customer b2c (typically calculated on the basis of the European market)
You can automatically set the calculation of your prices by defining a markup that is calculated on the Taxable Price or on the Best Taxable or on the Street Price.
In this configuration step you decide what is the reference price on the basis of which to calculate your markup.
MARKUP. In this section you need to choose what is the desired markup to add to the base price for the calculation of the sale price, during the import procedure.
The final price is calculated as base price + (base price * (markup / 100))
CURRENCY COEFFICIENT. If your shop does not use the same currency as the supplier, here you set the currency conversion rate.
ROUND PRICE. Automatic calculation of the sales price can result in visually unattractive prices for your shop. The Rewix Plugin configures the rounding of prices. It is possible to set a rounding:
- Null, i.e. the selling price is exactly the same as the pre-set mathematical calculation.
- Rounding to xxx.99 or for example 23.99
- Rounding to xx9.00 or for example 29.00
- Rounding to xx9.99 or for example 29.99
The definition of the selling price is therefore automatic and immediate.